Many homeowners underestimate the complexity of water damage remediation, believing it’s just about drying out the space. However, effective remediation involves a multi-step approach that can greatly influence the outcome. By understanding how to assess damage, ensure safety, and address the root cause, you can prevent further complications. But, there’s more to the process that can make an essential difference in your home’s recovery and safety.
Key Takeaways
- Assess the extent of water damage by identifying the source and documenting visible signs for insurance purposes.
- Ensure safety by wearing protective gear and shutting off power before beginning remediation efforts.
- Stop the source of water intrusion by inspecting plumbing and exterior areas for leaks and repairs.
- Remove standing water promptly using pumps or wet vacuums, focusing on hidden pockets of water.
- Dry and dehumidify affected areas with dehumidifiers and fans to prevent mold growth and further damage.
Assess the Extent of Water Damage
When evaluating the extent of water damage, it’s essential to act quickly to minimize further issues.
Start your water damage assessment by identifying the source of the water intrusion. Look for visible signs like discoloration on walls, warped flooring, or musty odors.
Once you’ve pinpointed the source, conduct a thorough damage evaluation. Check behind walls and under floors, as hidden damage can lead to mold growth and structural problems.
Document your findings with photos and notes to keep a record for insurance claims or professional help.
Prioritize areas most affected, such as basements or crawl spaces, where water tends to accumulate.
Engage with professionals if the damage seems extensive; their expertise can save you time and money.
Ensure Safety First
After evaluating the extent of water damage, prioritizing safety is imperative before taking any further steps.
Start by donning the appropriate protective gear, such as gloves, masks, and waterproof boots. This equipment shields you from potential contaminants and hazardous materials often present in water-damaged environments.
Familiarize yourself with emergency procedures, as they’re essential for ensuring everyone’s safety. Identify exits, and avoid areas that may be structurally compromised. If the situation involves electrical hazards, shut off power to prevent shocks.
Always have a first-aid kit on hand, ready for any unforeseen incidents.
If the damage is extensive, consider evacuating the premises until professionals assess the situation.
Stop the Source of Water Infiltration
To effectively address water damage, it’s crucial to promptly stop the source of water infiltration.
Begin with thorough water source identification to locate where the moisture is coming from. This could be from leaky pipes, faulty appliances, or even roof leaks. Once identified, you can take decisive action to remedy the issue.
Here are some steps to guide you:
- Conduct a plumbing inspection to check for hidden leaks.
- Inspect your home’s exterior for cracks or gaps that may allow water entry.
- Regularly maintain gutters and downspouts to direct water away from your foundation.
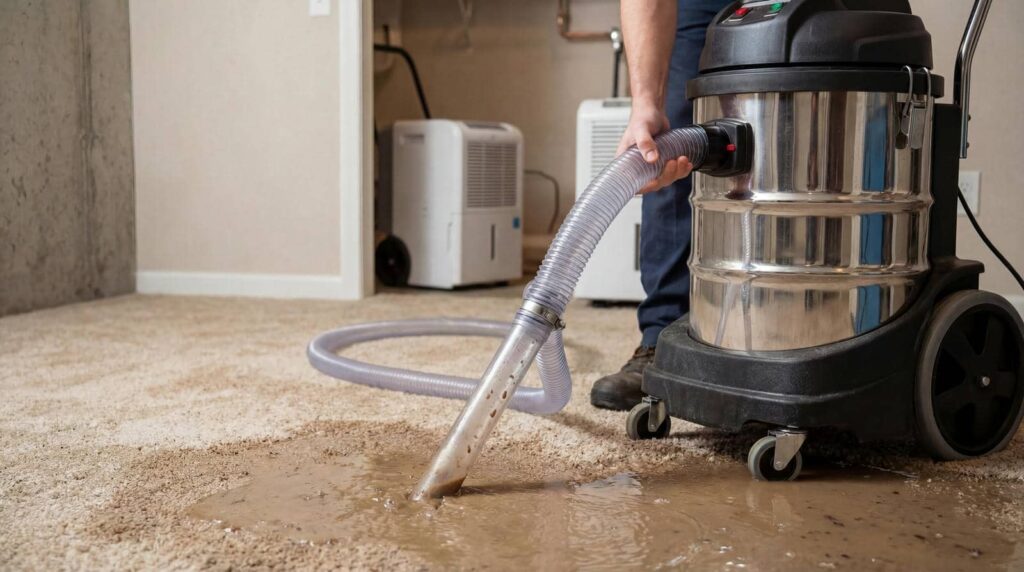
Remove Standing Water Promptly
Once you’ve stopped the source of water infiltration, taking immediate action to remove standing water is critical. Standing water can lead to severe damage and create an environment for mold growth.
Start by using a pump or wet vacuum for efficient water extraction. If the area is extensive, consider renting professional-grade equipment to expedite the process.
Make sure to prioritize safety; wear protective gear like gloves and boots to avoid hazards. As you remove the water, keep an eye on moisture levels in the surrounding materials. Effective moisture control is essential to prevent long-term issues.
After extraction, thoroughly check for hidden pockets of water, especially in walls and under floors, as these can harbor additional moisture that may compromise your efforts.
Dry and Dehumidify Affected Areas
While it may be tempting to overlook the drying phase, effectively drying and dehumidifying affected areas is essential for preventing further damage and mold growth.
To achieve this, you’ll need to employ proper dehumidification techniques and utilize the right drying equipment.
- Use high-capacity dehumidifiers to remove excess moisture from the air.
- Set up fans to increase airflow and speed up the drying process.
- Monitor humidity levels with a hygrometer to ensure ideal conditions.
Clean and Sanitize Surfaces
After thoroughly drying and dehumidifying the affected areas, the next step is to clean and sanitize surfaces to eliminate any remaining contaminants.
Start by selecting appropriate cleaning agents that are designed to tackle water damage; these can include mild detergents or specialized solutions. Use a scrub brush or a cloth to remove dirt and residues effectively.
Once surfaces are cleaned, employ sanitizing techniques to ensure they’re safe for use. This may involve using a disinfectant spray or wipes, following the manufacturer’s instructions for proper application.
Pay special attention to high-touch areas, as these can harbor harmful bacteria.
Check for Mold Growth
As you assess the aftermath of water damage, checking for mold growth is essential, since mold can develop within 24 to 48 hours in damp conditions.
Early detection is key to effective mold prevention and maintaining a healthy environment for you and your loved ones.
- Look for visible signs of mold, such as discoloration on walls or ceilings.
- Pay attention to musty odors, which often indicate hidden mold.
- Consider professional mold testing if you’re unsure about the presence of mold.
If you find mold, act swiftly to address the issue. Remove affected materials and ensure proper ventilation to reduce moisture levels.
Remember, mold can pose serious health risks, so prioritizing mold prevention protects your home and safeguards your family’s well-being.
Regular inspections can help you stay ahead of potential mold problems, fostering a safe and comfortable living space for everyone.
Repair and Restore Damaged Structures
Once you’ve addressed any mold concerns, it’s time to focus on repairing and restoring the structures affected by water damage.
Start by evaluating the extent of the damage. Check the structural integrity of walls, floors, and ceilings. If you notice weakened beams or sagging floors, these need immediate attention.
Use restoration techniques like drying out materials, replacing damaged sections, and reinforcing structures where necessary.
Consider using high-quality materials that match the original construction to maintain aesthetic appeal. For example, if you’re replacing drywall, opt for mold-resistant products.
Additionally, ensure that any insulation removed during the process is replaced with moisture-resistant options to prevent future issues.
Lastly, don’t rush the drying process. Thoroughly drying out affected areas is essential for effective restoration.
Prevent Future Water Damage
To effectively prevent future water damage, it’s crucial to implement proactive measures throughout your property. By taking the right steps, you can safeguard your home and enjoy peace of mind.
Here are some key strategies to contemplate:
Utilize waterproofing techniques: Apply sealants to walls and foundations to create a barrier against moisture.
Implement drainage solutions: Ensure gutters and downspouts direct water away from your home’s foundation, reducing the risk of flooding.
Inspect plumbing regularly: Check for leaks and replace old pipes to prevent sudden water damage.
Investing time in these preventive measures protects your property and fosters a sense of belonging within your community.
A well-maintained home contributes to the overall well-being of your neighborhood. By prioritizing these practices, you take ownership of your space, ensuring it remains a safe haven for you and your loved ones.
Frequently Asked Questions
How Can I Identify Hidden Water Damage in My Home?
To identify hidden water damage, look for water stains on walls or ceilings and sniff for musty odors. Check behind appliances and in crawl spaces, as these areas often conceal unseen moisture issues needing immediate attention.
What Types of Insurance Cover Water Damage Remediation?
Have you checked your coverage lately? Flood insurance and a homeowners policy often cover water damage remediation, but specifics vary. Always review your policy to ensure you’re protected against unexpected water-related issues in your home.
Should I Hire Professionals or Attempt DIY Water Damage Repair?
You should hire professionals for extensive damage, as they offer expertise and advanced tools. While DIY techniques might work for minor issues, professional benefits ensure thorough remediation, preventing future problems and promoting a safer environment for you.
How Long Does the Water Damage Remediation Process Usually Take?
The remediation timeline typically ranges from a few days to several weeks, depending on the extent of damage. The drying process is essential, influencing overall duration and effectiveness, so don’t rush—patience is key.
What Are the Long-Term Effects of Water Damage on My Health?
Water damage can lead to serious long-term health effects, like mold growth and respiratory issues. Have you considered how such damage might silently affect your well-being? Addressing it promptly can protect your health and home.
Summary
Effective water damage remediation is vital for protecting your property and health. By following these essential steps, from evaluating the damage to preventing future issues, you can minimize risks and ensure a safe environment. Stay proactive and vigilant, and don’t hesitate to seek professional help when needed. Your home deserves the best care against water-related threats.