When dealing with mold after water damage, your first priority should be addressing the moisture source. If you don’t act quickly, mold can spread rapidly. You’ll need to assess the damage thoroughly before starting cleanup. Understanding the right tools and methods is essential for effective removal. But what should you know about the step-by-step process? And when is it time to call in the experts? Let’s explore these important considerations.
Key Takeaways
- Identify and eliminate the source of water intrusion to prevent further mold growth.
- Dry affected materials within 24-48 hours using fans, pumps, and dehumidifiers.
- Assess damage and document findings with photos and notes for effective remediation planning.
- Use proper safety gear, including gloves and masks, during the mold removal process.
- Maintain humidity levels between 30-60% and conduct regular inspections to prevent mold recurrence.
Immediate Steps for Mold Prevention After Water Damage
When you experience water damage, acting quickly is crucial to prevent mold growth. First, identify and stop the source of the water intrusion. Next, remove any standing water using pumps or wet vacuums.
Once the area is dry, focus on implementing preventative measures. This includes drying out materials such as walls, carpets, and furniture within 24-48 hours. Ensure effective ventilation by opening windows and using fans to circulate air.
Dehumidifiers can also help maintain ideal humidity levels below 60%. Additionally, consider using mold-resistant products for repairs.
Regularly inspect areas prone to moisture, like basements and bathrooms, to catch potential issues early. Taking these steps can greatly reduce the likelihood of mold development and create a healthier living environment.
Assess Damage Before Cleanup
Before diving into cleanup efforts, it’s essential to thoroughly assess the damage to ensure proper remediation.
Start by identifying the water sources that caused the damage; whether it’s a burst pipe, flooding, or leaks, knowing the source helps in understanding potential mold types you might face.
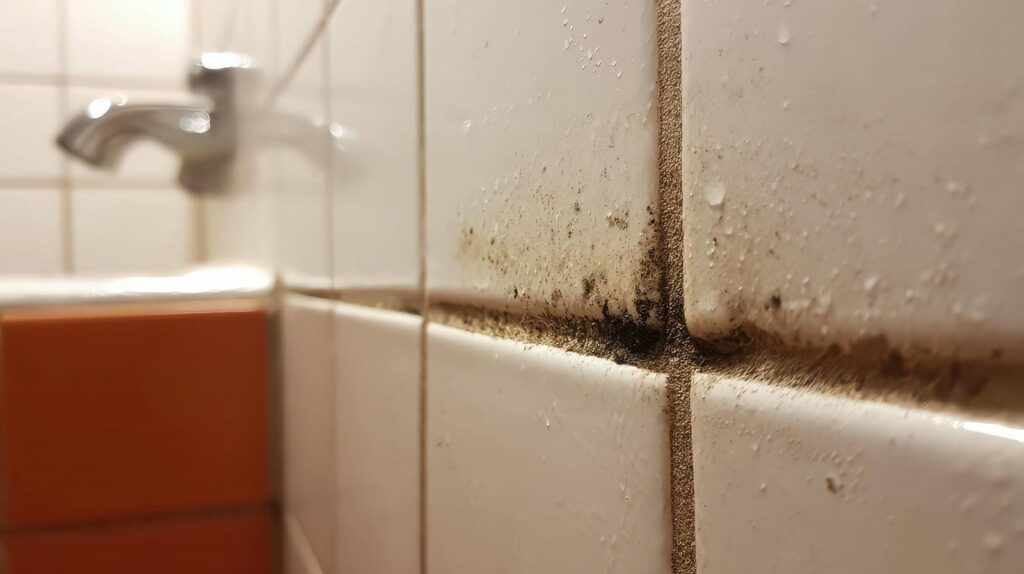
Check for visible mold growth and areas of high humidity, as these are prime spots for various mold types, including black mold and white mold.
Use a moisture meter to quantify dampness, which can guide your cleanup strategy.
Document the extent of the damage with photos and notes, as this information will be invaluable if you need to involve professionals later.
A detailed assessment sets the stage for effective and safe mold removal.
What Tools Do You Need for Mold Removal?
After evaluating the damage, gathering the right tools for mold removal is essential for effective remediation.
Start with vital cleaning supplies like a HEPA vacuum to capture spores and mold-resistant detergent for thorough cleaning. You’ll also need personal protective equipment (PPE), including gloves, goggles, and a mask to ensure your safety during the process.
Scrubbing brushes and sponges will aid in the physical removal of mold, while an infrared thermometer can help identify hidden moisture.
For more advanced mold removal techniques, consider a fogger for treating larger areas.
Having these tools on hand will streamline your efforts, making the process safer and more efficient, allowing you to reclaim your space confidently.
Step-by-Step Guide to Mold Removal
Before you begin mold removal, assess the affected areas thoroughly to determine the extent of the problem.
Make sure you wear proper safety gear, including gloves and a mask, to protect yourself from exposure.
Once you have a clear understanding of the situation and are equipped safely, you can proceed with the removal process.
Assess The Affected Areas
To effectively tackle mold removal, begin by thoroughly evaluating the affected areas in your home. Identify all visible mold growth, paying close attention to damp spaces like basements, bathrooms, and around windows.
Use a flashlight to inspect hidden corners and behind furniture. Check for water damage signs, such as discoloration or peeling paint, which indicate ongoing moisture control issues.
Note the extent of the mold; smaller patches might require less intensive remediation than larger infestations. Document these findings to guide your next steps.
Use Proper Safety Gear
Once you’ve assessed the affected areas, it’s time to focus on safety. Proper safety gear is vital to protect yourself during mold removal.
Start by wearing protective clothing, such as long-sleeved shirts, pants, and gloves, to shield your skin from mold spores. Consider using disposable coveralls for added protection.
Next, don a high-quality N95 respirator or a full-face respirator to filter airborne spores effectively. Safety goggles are important to prevent eye irritation and exposure. If you’re dealing with extensive mold growth, a face shield provides extra coverage.
Finally, ensure proper ventilation in the workspace to reduce spore concentration. By using these safety gear types, you’ll create a safer environment for yourself and anyone assisting you in the mold removal process.
When to Call Professionals for Mold Remediation?
How can you determine when it’s time to call in professionals for mold remediation? If you notice extensive mold growth, particularly in hidden areas like walls or ceilings, it’s a clear signal.
When the affected area exceeds 10 square feet, professional help is essential. Also, if you or others in your home experience health risks—like respiratory issues or allergic reactions—it’s best to consult experts.
Mold can pose serious health threats, especially for vulnerable individuals. Additionally, if the source of moisture isn’t resolved, mold will likely return.
Professionals have the tools and expertise to identify and eliminate the root cause effectively. Trusting experts ensures thorough remediation while safeguarding your family’s health.
How to Prevent Mold From Coming Back
To prevent mold from returning, you need to maintain low humidity levels in your home, ideally between 30-60%.
Regular inspections and cleaning of potential problem areas, such as bathrooms and basements, are vital for early detection.
Implementing these practices will greatly reduce the risk of mold reestablishing itself.
Maintain Low Humidity Levels
Maintaining low humidity levels is essential for preventing mold from reappearing in your home. Effective humidity control not only inhibits mold growth but also creates a healthier living environment. You can achieve this by using dehumidifiers and ensuring proper ventilation. Installing moisture barriers in basements and crawlspaces can further reduce humidity levels. Here’s a quick reference table to guide your efforts:
| Method | Description |
|---|---|
| Dehumidifiers | Remove excess moisture from the air |
| Ventilation | Improve air circulation |
| Moisture Barriers | Block moisture from entering spaces |
| Regular Maintenance | Check and repair leaks promptly |
| Temperature Control | Keep indoor temperatures consistent |
Regularly Inspect and Clean
Regularly inspecting and cleaning your home is essential in preventing mold from returning. Establishing thorough cleaning schedules helps you identify potential mold growth before it becomes a problem.
Focus on high-risk areas like bathrooms, kitchens, and basements, where moisture often accumulates. Use a mixture of water and vinegar or a commercial mold remover to clean surfaces regularly.
Make certain to check behind appliances and under sinks, as these spots can harbor hidden moisture. After cleaning, ensure proper ventilation to keep humidity levels low.
Document your inspections and cleaning activities to track progress and maintain accountability. By being proactive, you protect your home and create a safe environment for you and your loved ones.
Consulting Mold Remediation Experts: What to Expect
When you consult mold remediation experts, expect a thorough assessment of your property and a detailed action plan tailored to your specific situation. They’ll start with a comprehensive mold inspection checklist, identifying affected areas and potential sources of moisture. Utilizing advanced remediation techniques, they’ll ensure the mold is effectively removed, while minimizing disruption to your home.
| Emotional Impact | Expert Guidance |
|---|---|
| Peace of mind | Knowledgeable support |
| Safe living environment | Tailored action plans |
| Long-term solutions | Professional accountability |
| Community connection | Trust in certified experts |
Frequently Asked Questions
How Long Does Mold Take to Grow After Water Damage?
Mold can start growing within 24 to 48 hours after water damage, depending on the mold types and conditions. Implementing preventive measures, like proper ventilation and moisture control, can greatly reduce growth risks.
Can I Use Bleach to Kill Mold Effectively?
Bleach isn’t a mold removal miracle; it’s only effective on non-porous surfaces. It can kill surface mold, but won’t prevent regrowth. For lasting results, consider specialized mold removers or professional services to tackle deeper infestations.
What Health Risks Are Associated With Mold Exposure?
Mold exposure can lead to respiratory issues, skin irritations, and allergic reactions. You should stay vigilant about mold symptoms and implement prevention strategies, like maintaining humidity levels and ensuring proper ventilation, to safeguard your health.
Is It Safe to Stay in My Home During Mold Removal?
It’s often risky to stay during mold removal; the air can feel thick with spores. Prioritize your safety by implementing mold safety measures and seeking a professional assessment to ensure your home becomes a safe haven again.
Do I Need to Discard Belongings Affected by Mold?
You don’t always need to discard belongings affected by mold. Conduct a thorough mold assessment first. If preservation’s possible through cleaning or treatment, it’s often preferable to retain your items rather than replace them.
Summary
In the aftermath of water damage, think of mold removal as a gardener pruning a wilting plant. By addressing moisture and employing the right tools, you’re not just eliminating a threat; you’re nurturing a healthier environment. Just as a well-tended garden flourishes, maintaining low humidity and seeking expert help when needed ensures your home remains resilient against future mold. Embrace this proactive approach, and you’ll cultivate a safe, thriving space for years to come.